How to Perfectly Apply Highlighter and Blush for a Radiant Look
Cette section contient des liens d'affiliation/This post contains affiliate links. Consulter la divulgation ICI/Read the full disclosure HERE.
Did you know that 72% of beauty consumers are actively seeking products that offer a “natural glow” or a “luminous finish,” with blush and highlighter consistently ranking among the top three tools to achieve this effect, according to recent industry reports? This isn’t just a trend; it’s a testament to our collective desire for healthy, vibrant-looking skin.
I remember a time when my makeup routine felt like a chore, and honestly, a bit of a mystery. For years, I stumbled through applying foundation, then perhaps a swipe of blush, and I dismissed highlighter as something only for professional photoshoots.
My complexion often looked flat, or inversely, I’d overdo it and end up looking more like a disco ball than a naturally radiant person ! It wasn’t until I truly dedicated myself to understanding the purpose and placement of how to apply highlighter and blush on face that my entire makeup world shifted.
Suddenly, my face looked more defined, my skin healthier, and my confidence soared.
Why Highlighter and Blush Are Your Glow-Up Essentials
Blush brings life and warmth to your complexion, mimicking a natural flush, while highlighter adds dimension and luminosity by catching and reflecting light on the high points of your face. Together, they create a harmonious balance, sculpting your features and giving you that coveted healthy glow.
Preparing Your Canvas: Pre-Application Tips
Before you even touch your makeup brushes, good skin preparation is crucial for a flawless application.
Skin Prep is Key
- Cleanse and Moisturize: Start with a clean, well-hydrated face. This creates a smooth surface for makeup to adhere to.
- Prime: A good primer can blur imperfections, extend makeup wear, and create an even base, especially if you have concerns about texture or oiliness.
Choosing the Right Shades
The right shades complement your skin tone, enhancing your natural beauty rather than overpowering it.
- Blush: For fair skin, opt for soft pinks or peaches. Medium tones can experiment with warmer peaches, roses, and berry shades. Deeper skin tones shine in rich berries, terracotta, and vibrant reds.
- Highlighter: Cool undertones often suit silvery or champagne highlighters, while warmer undertones look stunning with golden or bronze hues. Universal shades often have a peachy or soft gold tint.
How to Apply Blush Like a Pro : Step-by-Step Guide
Selecting Your Blush Formula
- Powder Blush: Best for oily skin types, offers a matte or satin finish, and is easy to blend.
- Cream Blush: Ideal for dry to normal skin, provides a natural, dewy finish, and blends seamlessly.
- Liquid Blush: Very buildable and highly pigmented, perfect for a long-lasting, natural flush.
Finding Your Perfect Placement
The goal is to apply blush where you would naturally flush, adding warmth and a youthful appearance.
- Smile Gently: This helps you identify the “apples” of your cheeks.
- Apply to the Apples: Using a fluffy blush brush (for powder), your fingers, or a sponge (for cream/liquid), apply blush to the center of the apples.
- Blend Upwards Towards Temples: Blend the color gently upwards along your cheekbones towards your hairline, ensuring no harsh lines.
- Build Gradually: Start with a small amount and build intensity as needed. It’s easier to add more than to take away.
How to Apply Highlighter for a Luminous Glow
Choosing Your Highlighter Type
- Powder Highlighter: Most common, offers a range of finishes from subtle sheen to intense shimmer.
- Liquid Highlighter: Great for a natural, dewy glow, can be mixed with foundation.
- Cream Highlighter: Offers a skin-like finish, excellent for dry skin, easy to blend with fingers.
Strategic Placement for Maximum Radiance
Highlighter works by catching light on the highest points of your face, bringing them forward and adding dimension.
Top of Cheekbones: Apply a small amount in a ‘C’ shape from the outer corner of your eye up to your temple.
- Brow Bone: A tiny dab just under the arch of your eyebrow can lift and brighten your eyes.
- Bridge of Nose: A thin line down the center of your nose can make it appear straighter and more defined. Avoid the tip if you have an oily nose.
- Cupid’s Bow: A touch just above the center of your upper lip can make your lips appear fuller.
- Inner Corner of Eyes: A small dot here can instantly make your eyes look more awake and brighter.
The Art of Synergy: Blending Blush and Highlighter Seamlessly
The magic truly happens when your blush and highlighter melt together on your skin, creating a seamless, natural transition.
Harmony in Hues
Consider blush and highlighter shades that complement each other. A peachy blush with a golden highlighter, or a cool pink blush with a champagne highlighter, often work beautifully together.
Blending Techniques for a Natural Finish
- Layering: Apply blush first, then highlighter.
- Soft Edges: Use clean brushes or a damp beauty sponge to gently tap and blend the edges where the two products meet. This ensures there are no obvious lines, just a radiant gradient.
- Light Hand: Remember, less is often more. You can always add a bit more product if you want a more intense effect.
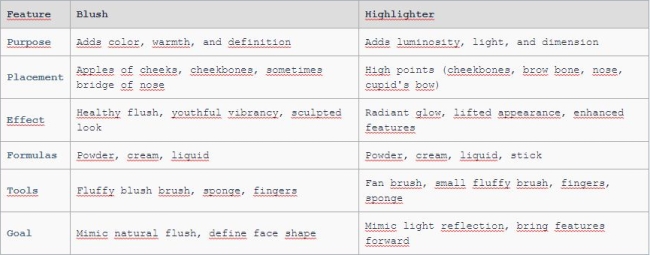
Blush vs. Highlighter: A Detailed Comparison
To help you distinguish their unique roles and applications, here’s a detailed comparison:
Embrace Your Radiant Self!
Experimenting with how to apply highlighter and blush on face is a journey of self-discovery and fun. There’s no single “right” way, only what makes you feel beautiful and confident. Once you master these two products, you’ll be amazed at the natural radiance you can achieve, making every day feel like a special occasion.
Ready to truly master your glow and make every day a radiant one? We’ve put together an exclusive ‘Radiant Glow Starter Kit’ guide, complete with our top product recommendations, designed to help you confidently achieve that perfect luminous finish.